Running a Linux distribution on Windows
In the recent years, we have witnessed great progress towards achieving a quality Linux experience in Windows. The release of Windows Subsystem for Linux by Microsoft was a big milestone, creating a virtuous circle with other major players, such as Docker, improving their Windows support. This is an interesting turn of events, given the past tense in relationships between Microsoft and open source. Regardless, it is great news for software developers and Linux afficionados who are also Windows users, like myself.
In this article, we are going to demonstrate some excellent tools that will make your Linux experience in Windows feel almost native:
- WSL2 - a Linux simulator
- Windows Terminal - a lightweight and flexible terminal
- Zsh + Oh My Zsh - Linux shell on steroids
- VcXsrv - X Window Server (allows running Linux GUI apps)
WSL2
The Windows Subsystem for Linux allows using a Linux distribution in Windows, without having to install additional emulation software. WSL2 is the latest version of the software, taking it to the next level by offering a full Linux Kernel. For a more detailed comparison between versions, check this article in the official docs.
Installation
The offical installation guide is well documented and the 6-step manual setup process is generally easy. Make sure that your system meets the requirements - modern Windows 10 systems should be compatible. Finally, you can choose between a plethora of Linux distributions.
After the installation finishes, we can launch WSL2 by selecting the distribution we chose (eg Ubuntu) in the Start Menu.
Configuration
Before we start piping grep, awk and sed to infinity, we should configure our new installation to avoid some unpleasant surprises. In specific, at the time of writing there are two major caveats:
- Performance is less than ideal in the native Windows file system 🐌
- WSL2 will drain all your memory by default 🦇
Luckily there are solutions to both of them! For the first, we simply have to restrain ourselves in installing all projects under the Linux file system root (\\wsl$\Ubuntu-18.04\home\<user name>\Project). You can still run Linux commands under the Windows file system, it's just that they will be slower.
For the second issue, we have to configure the WSL global options, stored in a .wslconfig file under your Windows user folder. The settings that are we are interested in here are memory and processors. An example:
[wsl2]
memory=6GB
processors=4
With the above settings, using WSL2 feels pretty smooth for the vast majority of cases in my machine (16GB RAM/i7-4790K). I suggest starting a bit lower, perhaps at 4GB memory/2 processors, and then tune up if required.
Windows Terminal
Windows Terminal is a modern and lightweight terminal, which seems to strike a perfect balance between configurability and simplicity. It should feel familiar to Visual Studio Code users, since it shares some of its aspects (shortcuts, configuration options, command palette etc).
There are other terminal options in Windows, but I am not as satisfied with the ones I have tried. Git for Windows is easy to use and lightweight, but is somewhat restricted: for example, it doesn't support multiple tabs/split pane. ConEmu, which is what I used in the past, is very flexible with lots of features, but its configuration felt a bit overcomplicated at times.
Installation
You may have already installed Windows Terminal since it is an optional step in the WSL2 installation process. If not, the official installation guide is easy to use.
Configuration
Windows Terminal's configuration is very similar to Visual Studio Code. There are two ways to configure it: using the GUI, and using a settings .json file. The Customize settings page has a full list of the available options.
Let's demonstrate a useful configuration option. Although it is easy to change between terminal profiles in Windows Terminal (Ubuntu, Powershell etc.), it is still useful to select one of them as the default.
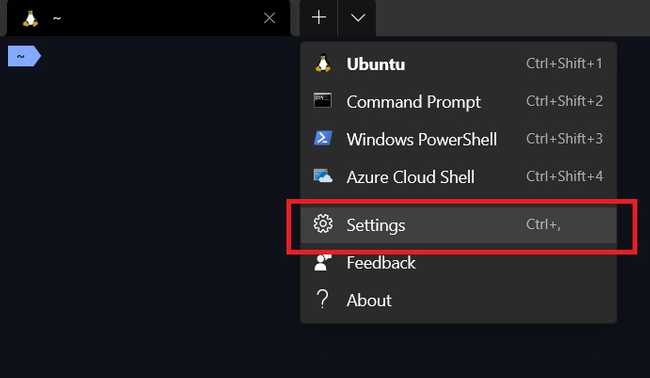
Select Settings from the Windows Terminal menu, or press
Ctrl + ,:In the Startup tab, click on Default profile on the top and make your choice:
Zsh/Oh My Zsh
Zsh is a shell which allows you to interact with the Linux kernel - you can think of it as the cousin of bash. Both shells have great features, but what sets zsh apart in my opinion is its plugin and theme support.
The most popular configuration framework for zsh is Oh My Zsh. With it, we can easily install and configure themes and plugins for zsh.
Installation
The following guides are well written and will guide you through the installation process:
Configuration
Oh My Zsh supports a vast amount of community themes, and some of them are really neat. The default theme (robbyrussell) will get the job done, but my personal favorite is Powerlevel10k:
Follow the Powerlevel10k installation guide
Powerlevel10k uses some special icons (glyphs). While not strictly required, it is highly recommended to install a compatible monospace font. I use
FiraCode, because it renders programming symbols like=>,==and===in an elegant way:You can install the Nerd Font version of FiraCode (which can render glyphs) in the Nerd Fonts page - search for
FiraCodethere.The next time you open you Linux terminal, a setup wizard will help you conifgure your command prompt. Lots of options here, and choosing them is a matter of preference. After some experimentation, I am in favour of a more minimalist style as you can see in the screenshot bellow:

VcXsrv
Wouldn't it be great to be able to launch Linux GUI apps in Windows? Good news - this is already possible! 🎉
To achieve this we will use VcXsrv, an X Windows System server for Windows.
Download and run the VcXsrv installer from SourceForge. Alternatively, you can also install it via Chocolatey - a highly recommended software management tool for Windows.
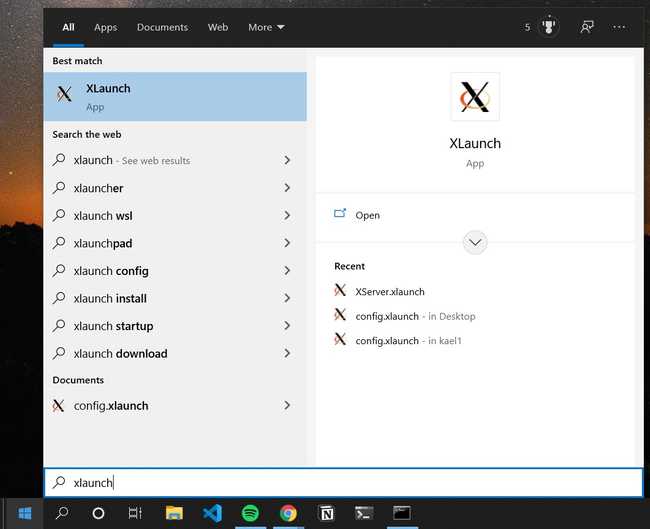
Launch VcXsrv by searching for
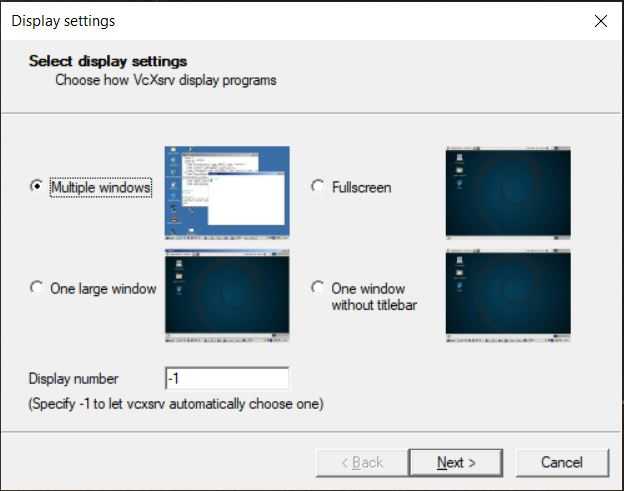
XLaunchin the Start Menu:In the first page of the settings wizard, use the default option ("Multiple windows"):
Use the default option in the second page too ("Start no client"):
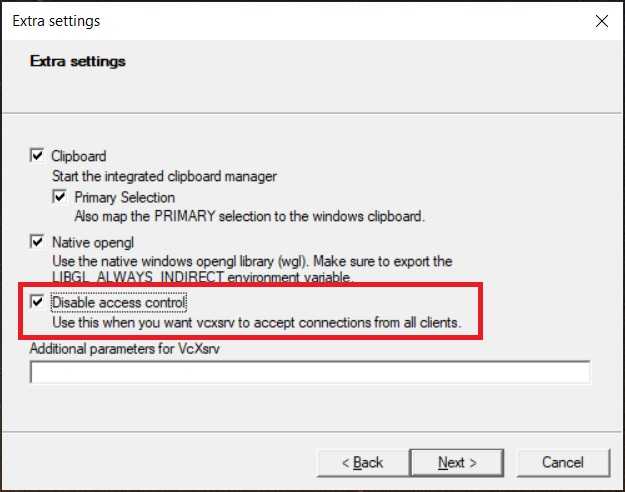
⚠️ In the third page, leave the default checkboxes enabled and make sure to also check "Disable access control". This is required for VcXsrv to accept WSL connections, since it has a different IP than the host machine. Another option could be adding a Firewall exception, but I find disabling access control safe and simple for local development.
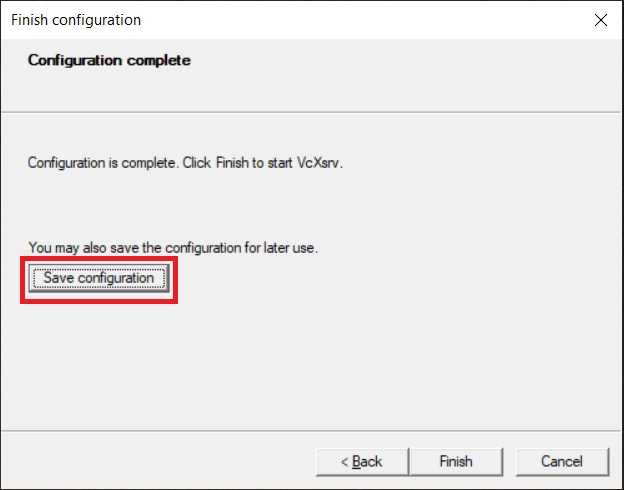
This step is optional but useful: before hitting "Finish" in the final step of the wizard, you can save our configuration for later use. I keep it under the installation folder (
C:\Program Files\VcXsrvby default) and add a shortcut for it in the Start Menu (%appdata%\Microsoft\Windows\Start Menu). Easy as!Add the following in your
.bashrc/.zshrcconfiguration:# Set DISPLAY variable to the IP automatically assigned to WSL2export DISPLAY=$(route.exe print | grep 0.0.0.0 | head -1 | awk '{print $4}'):0.0
As a final note, Microsoft has announced their intention to support Linux GUI apps via WSL in the next major release of Windows, which will make things even easier.
Conclusion
Getting our favourite penguin through Microsoft's windows was never so easy. Quality tools keep on appearing and the future looks really promising. But above all, it is great to see open source being universally recognised and supported by the software community 🐧✊
